Gift Card Management
Store Admins can create, manage, and track gift cards directly from the Gift Cards page in their Storefront dashboard. This guide walks through how to create gift cards, set start and expiration dates, cancel cards, make bulk updates, view user gift card history, and understand the icons and statuses on the page.
Accessing the Gift Card Page
Log into your Storefront dashboard.
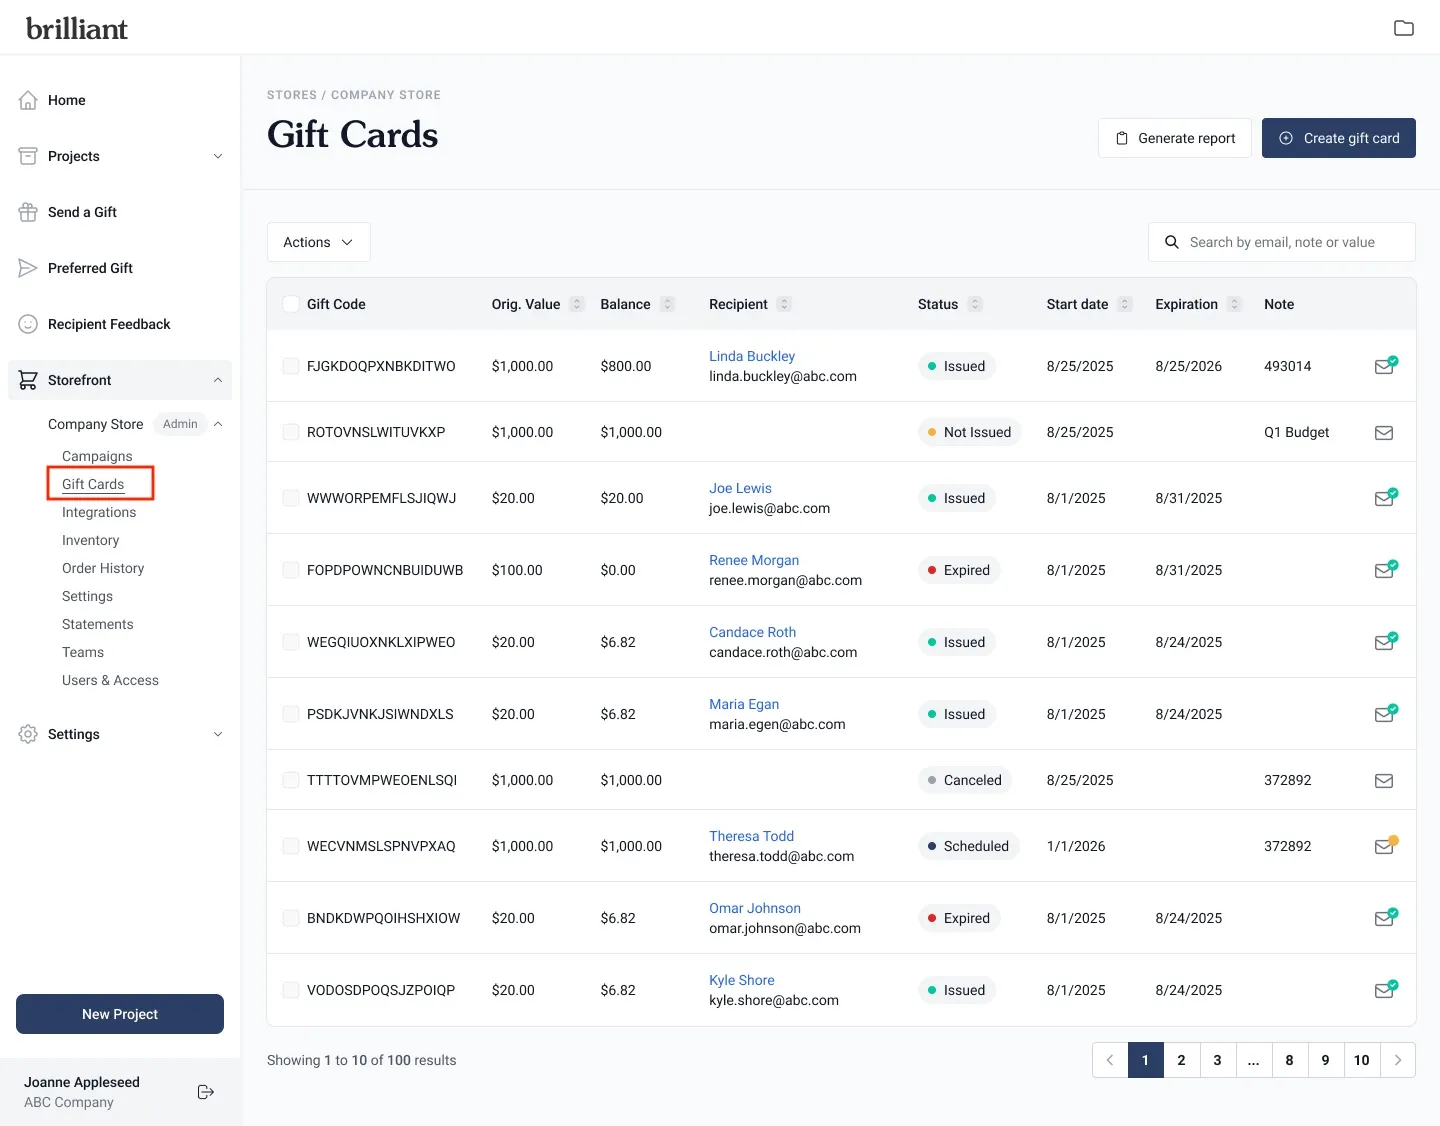
In the left-hand navigation, click on Gift Cards under the relevant Storefront.
You’ll see a table displaying all gift cards for that Storefront, including their amount, recipient, note, start and expiration dates, and current status.
Understanding Gift Card Icons and Statuses
Each gift card in the table includes icons and status labels that show its current state and delivery progress.
Email Icons
Email Icon with green checkmark: The gift card has been sent to the recipient.
Email Icon with yellow checkmark: The gift card is scheduled to be sent at a future start date.
Email Icon with no checkmark: The gift card has not yet been issued or assigned.
Hovering over these icons shows a tooltip with the current delivery status.

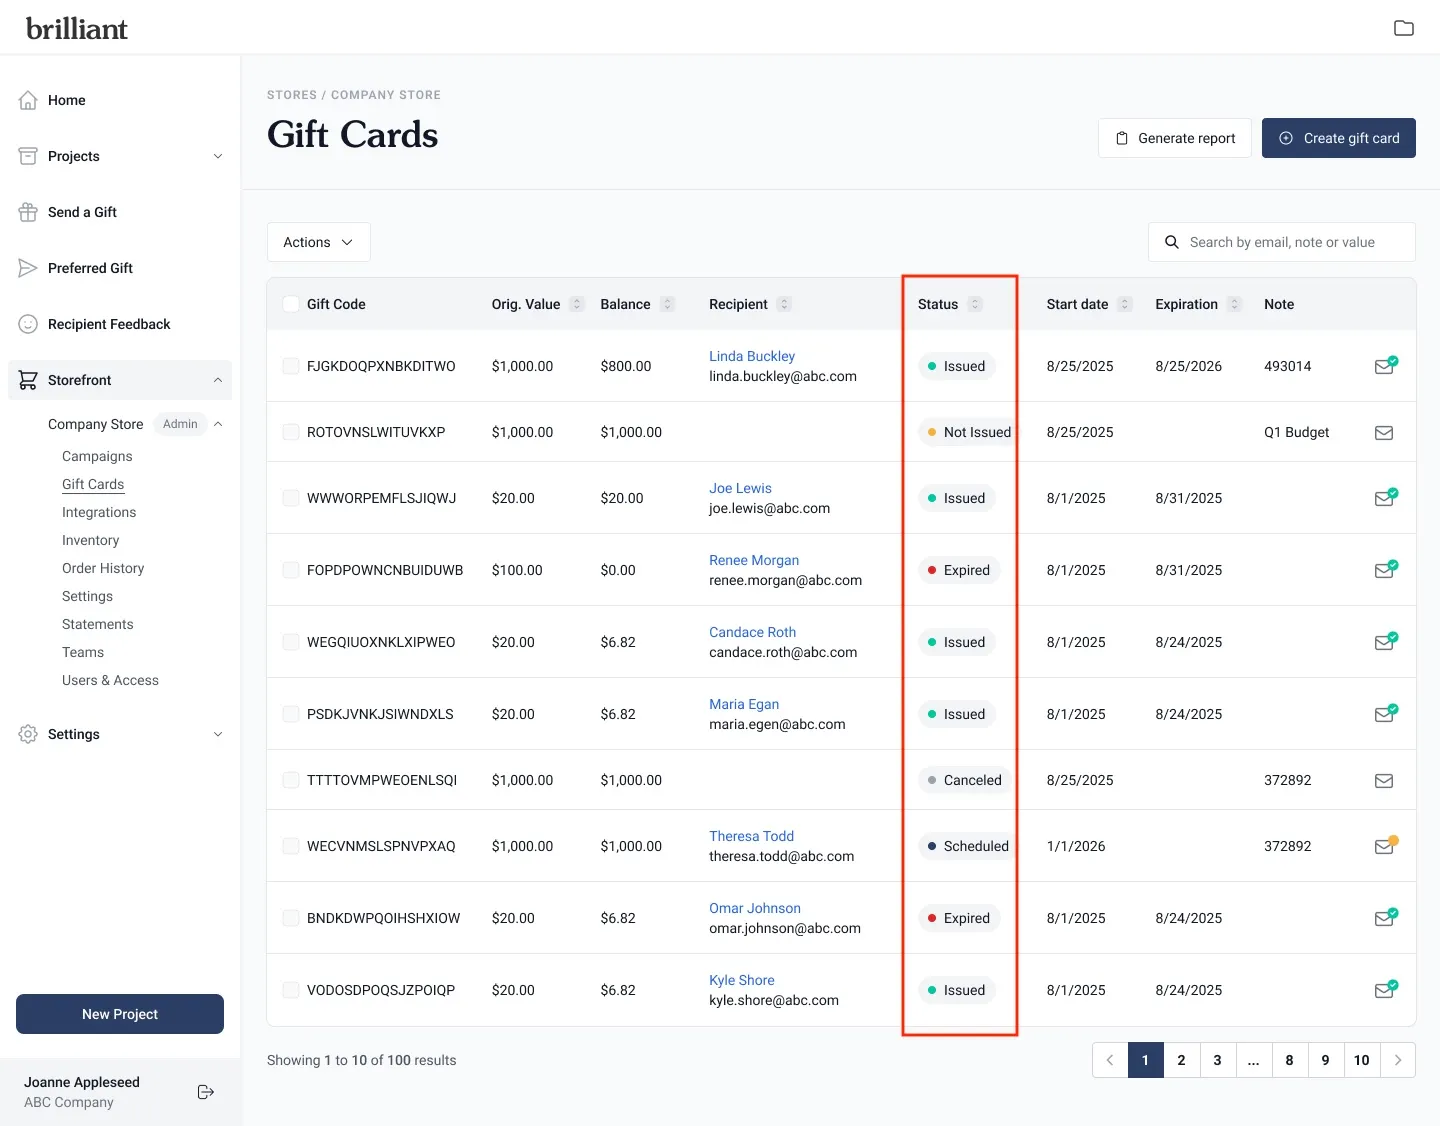
Statuses
Each gift card also displays a status in the table:
Not Issued: The card has been created but not sent to a user.
Issued: The card has been created and sent to the recipient.
Scheduled: The card has been created with a future start date.
Expired: The card has passed its expiration date and is no longer active.
Canceled: The card was manually canceled by an admin and cannot be redeemed.
Statuses automatically update based on card activity (for example, a Scheduled card becomes Issued once its start date is reached).
Creating a Gift Card
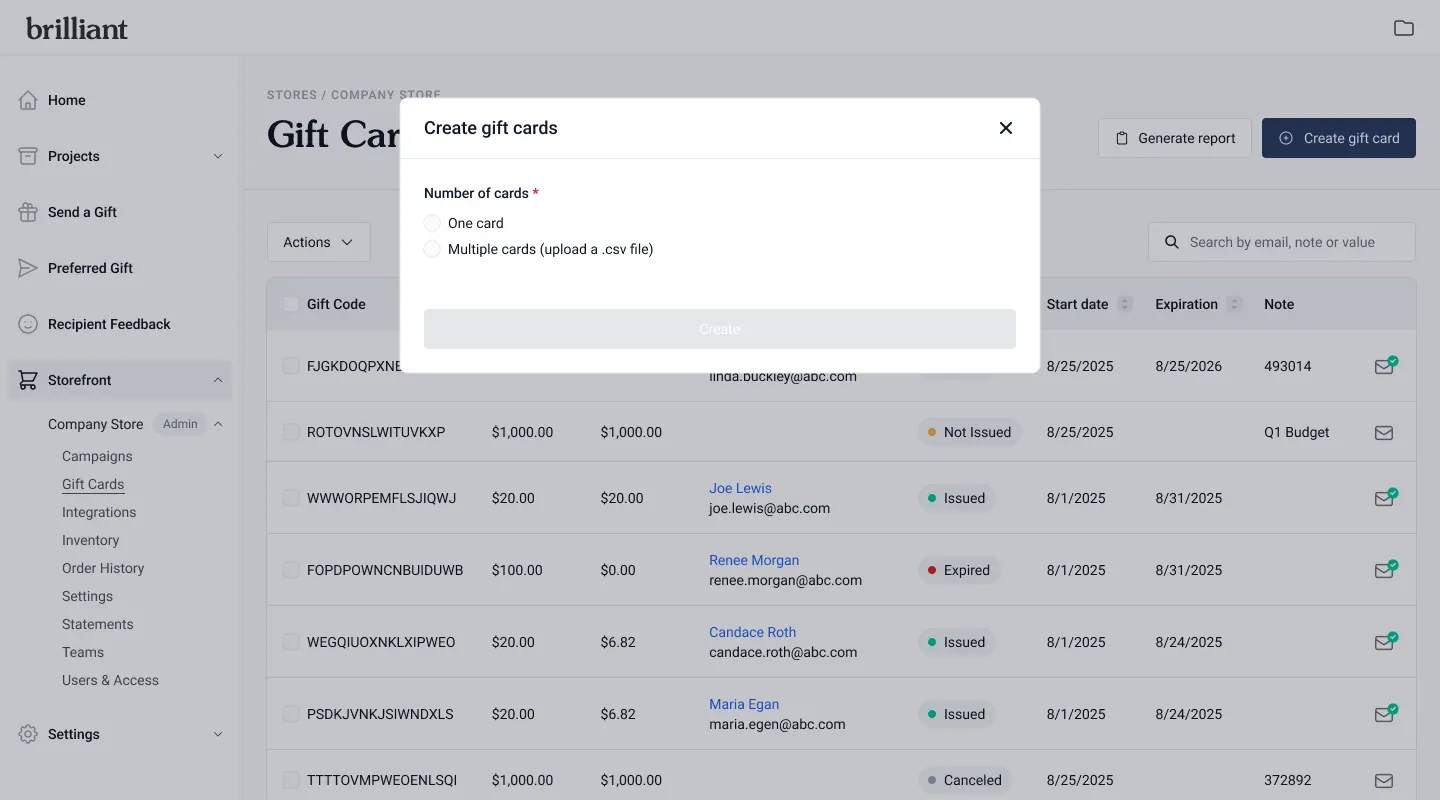
On the Gift Card page, click Create Gift Card in the upper-right corner.
Choose whether to create one gift card or multiple gift cards.
To create multiple cards at once, select Bulk Add and follow the instructions.
Enter the gift card amount.
Add a note if you’d like to include internal details or context.
Add the recipient by selecting a user from the dropdown.
You can search existing store users by name or email.
For public Storefronts, to send a gift card outside of your store, manually enter an email address.
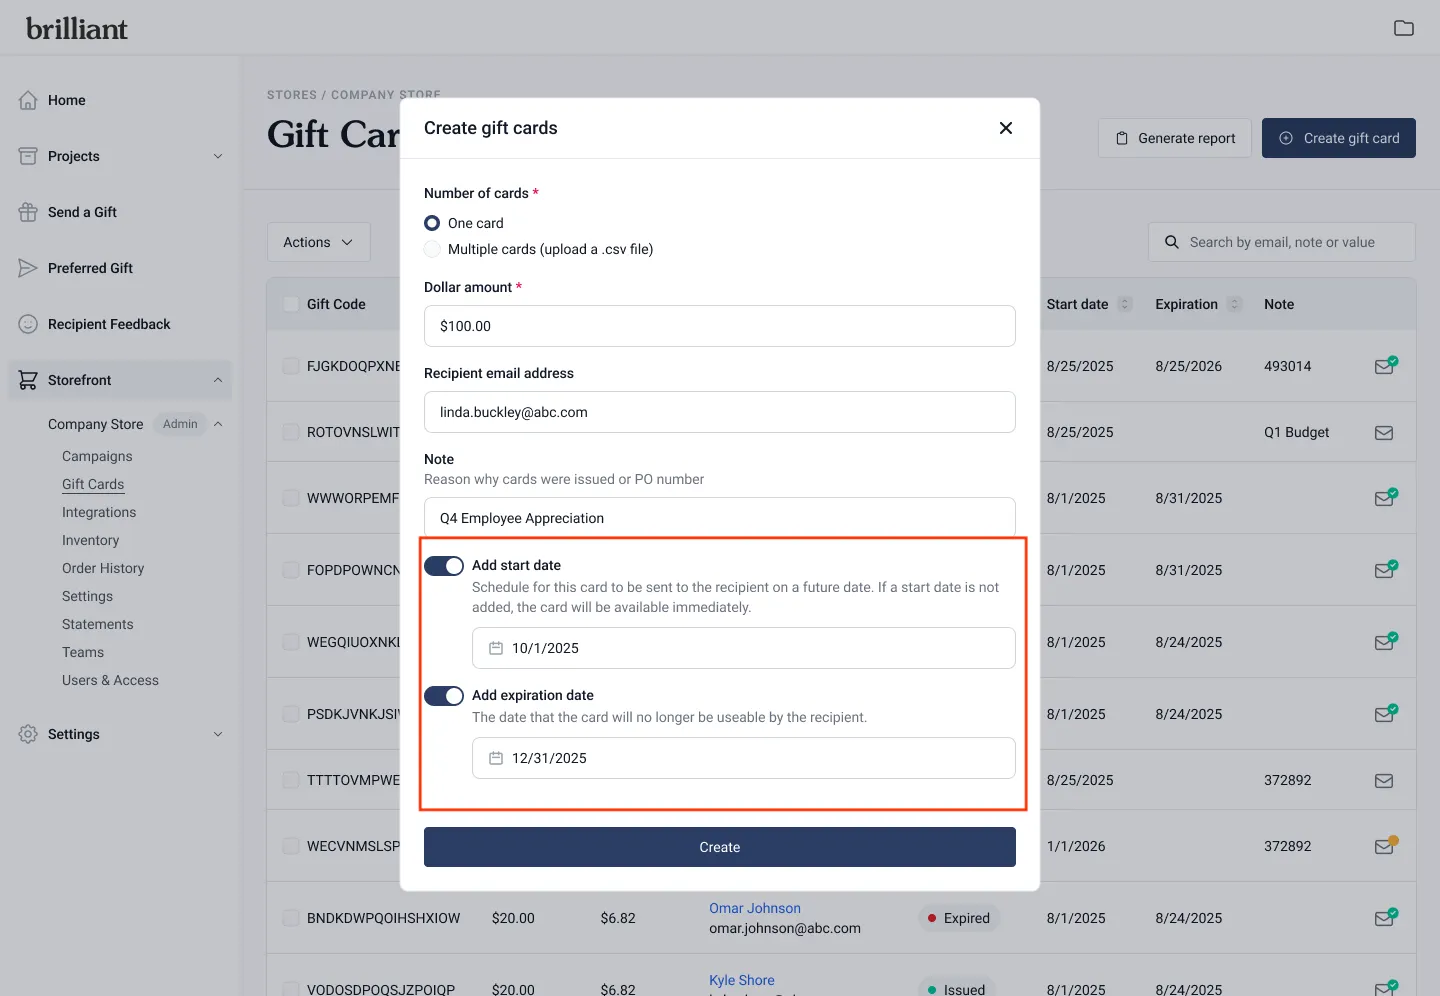
(Optional) Toggle Add Start Date and Add Expiration Date to schedule when the gift card becomes active and when it expires. More information about this here.
Click Create Gift Card to finalize.
Once created, your new card(s) will appear in the Gift Card table with the appropriate status (Not Issued, Issued, or Scheduled).

Scheduling Start and Expiration Dates
You can schedule when a gift card becomes active or when it expires.
When creating or editing a gift card, toggle on Add Start Date and/or Add Expiration Date.
Use the date picker to set your desired start and expiration dates.
Click Save.
If both fields are added:
The card will remain inactive until the start date, then automatically become active.
It will automatically expire at the expiration date, changing its status to Expired.
If only one field is set:
Setting a start date without an expiration allows the card to stay active indefinitely.
Setting only an expiration date makes the card active immediately but limits how long it can be redeemed.
Tip: Scheduled Sends can act as a recurring workaround for quarterly or seasonal programs by creating multiple gift cards with aligned start and expiration periods.
Canceling a Gift Card
Admins can cancel both unassigned and assigned gift cards.
From the Gift Card table, find the card you want to cancel.
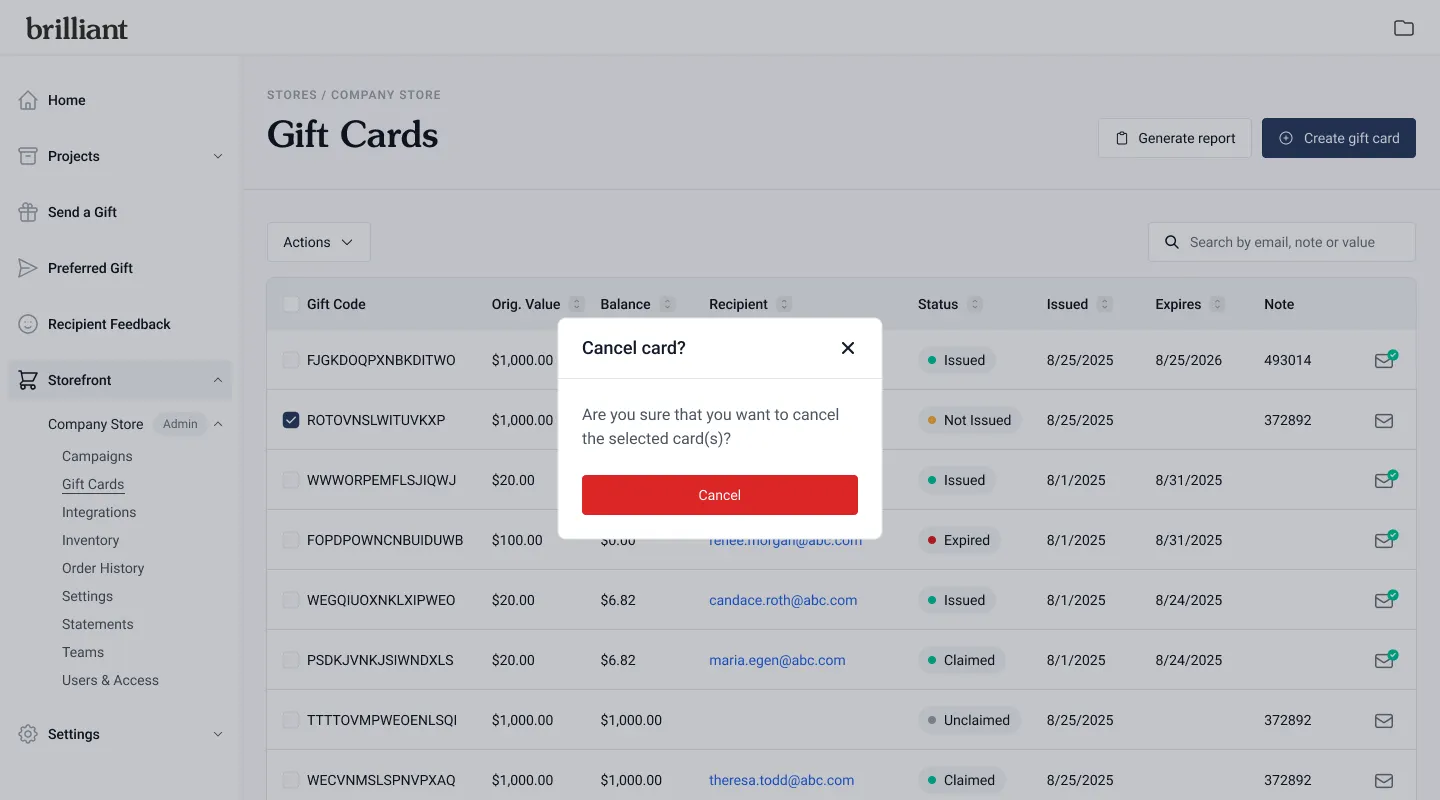
Click the checkbox next to the card (or multiple cards).
From the Bulk Actions dropdown, select Cancel Gift Card.
Confirm the cancellation when prompted.
Once canceled, the card’s status will update to Canceled, and it will no longer be redeemable.
Using Bulk Actions
Bulk Actions allow you to make updates to multiple cards at once.
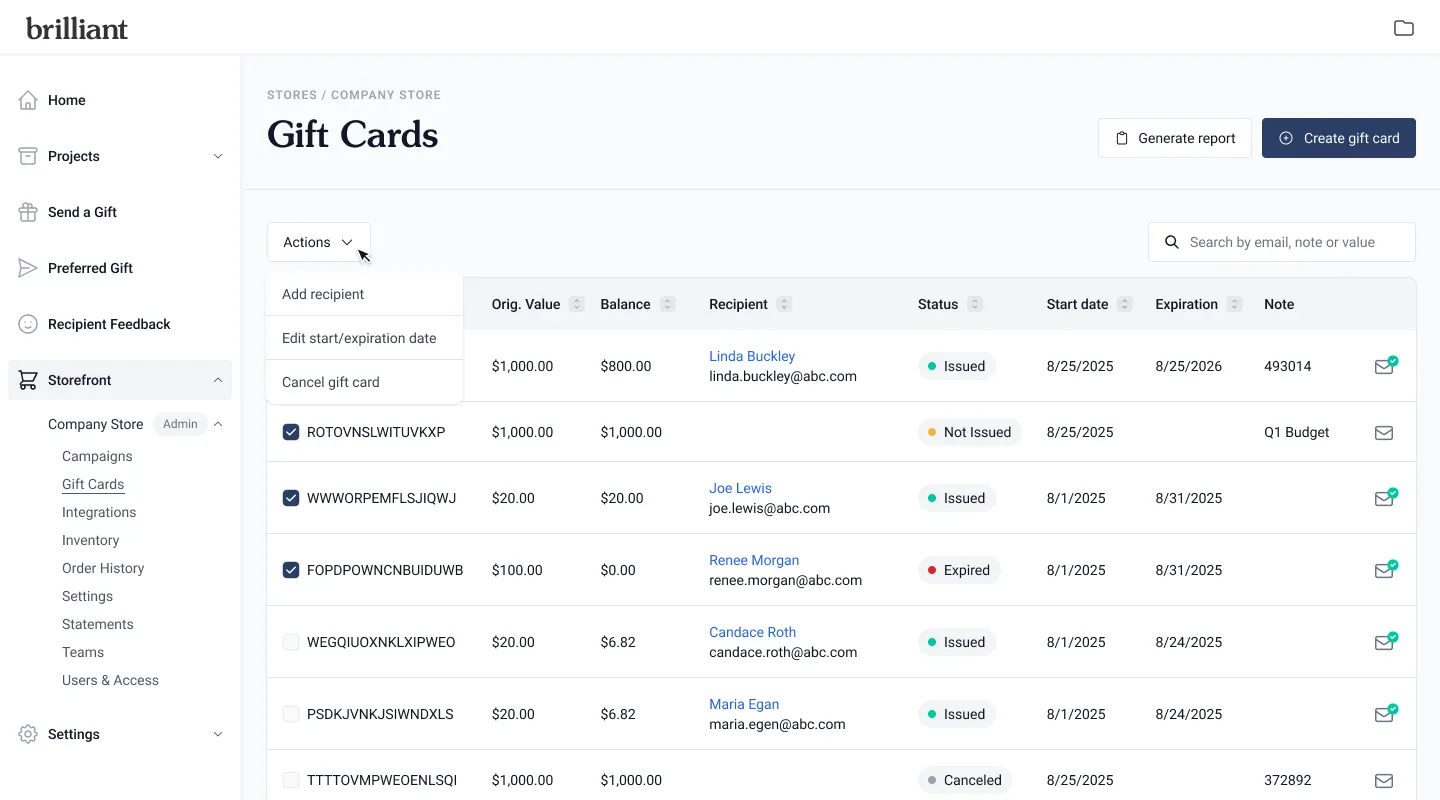
On the Gift Card table, select the checkbox next to each card you want to update.
Open the Bulk Actions dropdown and choose one of the following:
Add Recipient: Assign recipients to all selected cards.
Only available for cards with a Not Issued status.
Edit Start/Expiration Dates: Update timing for multiple cards at once.
Available for any cards that are not canceled.
Cancel Gift Card: Deactivate one or more cards immediately.
After confirming your action, the table will automatically update to reflect the new details.
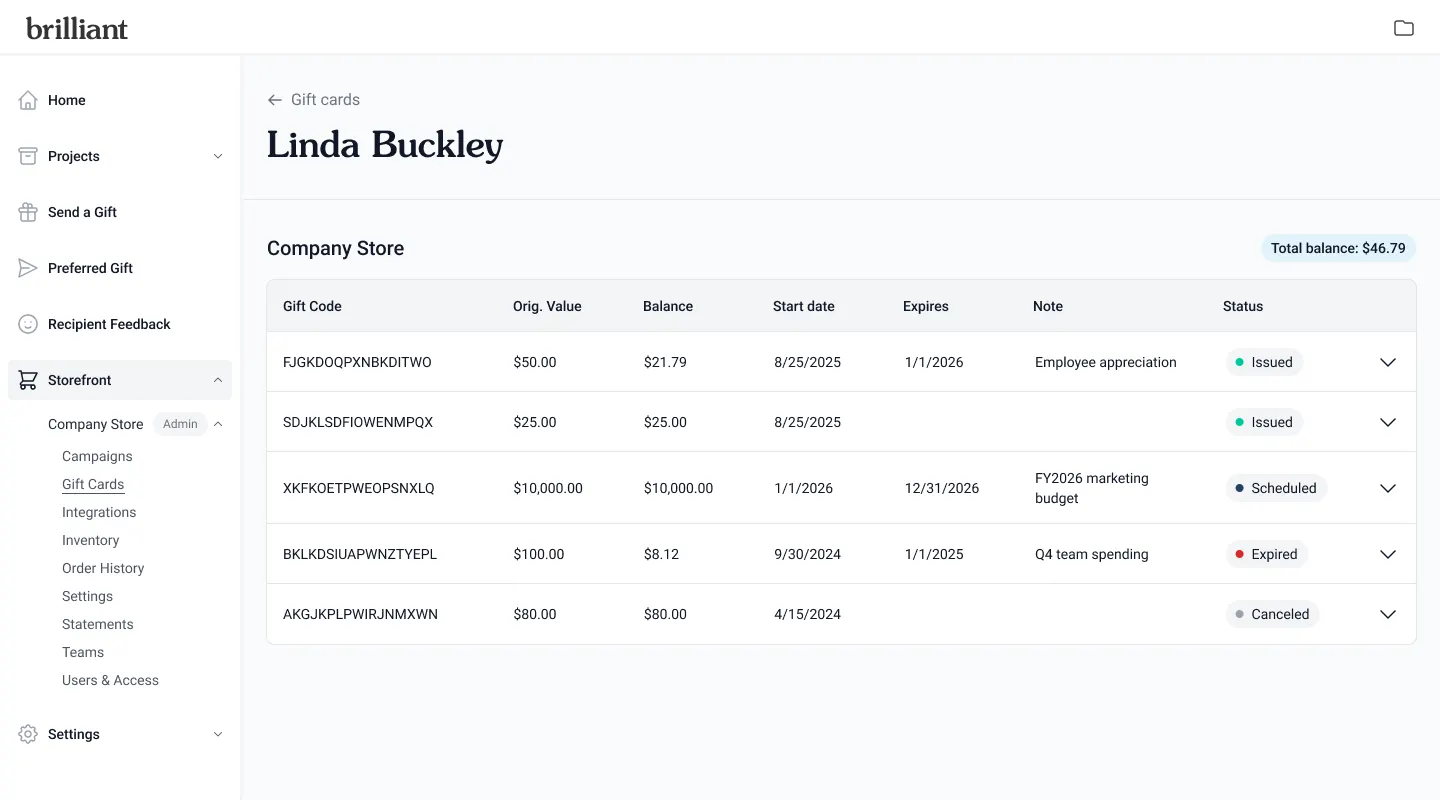
Viewing a User’s Gift Card History
Admins can view all gift cards linked to a specific user in one place.
In the Gift Card table, click on the name or email address of a recipient.
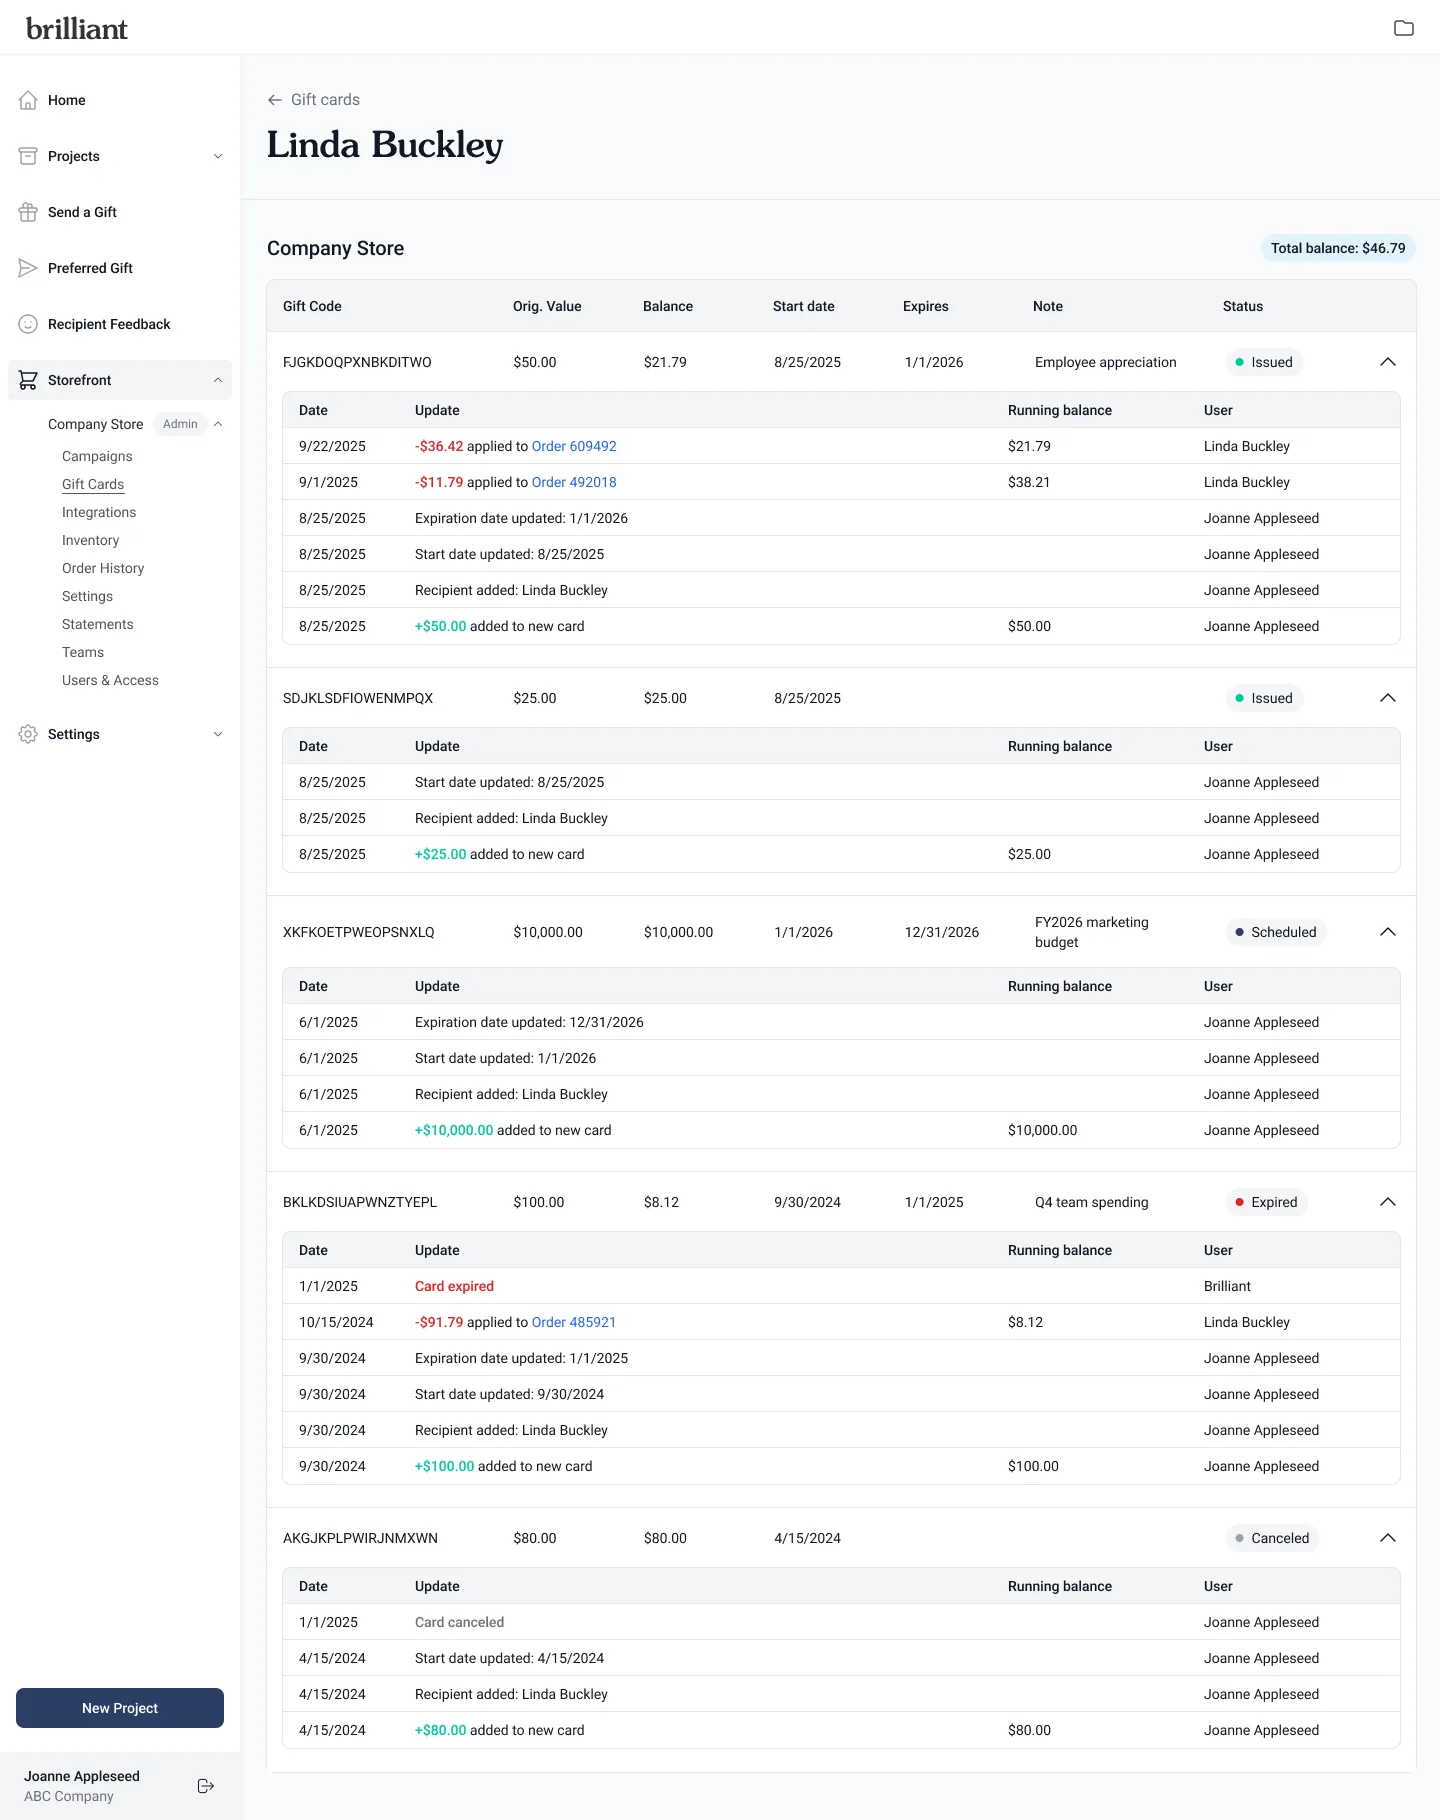
This opens a new admin-only view showing every gift card associated with that user.
Once uncollapsed, you’ll see a detailed timeline of all events, including:
When the card was created
When it became active
When it was redeemed, canceled, or expired
Each event’s date and timestamp